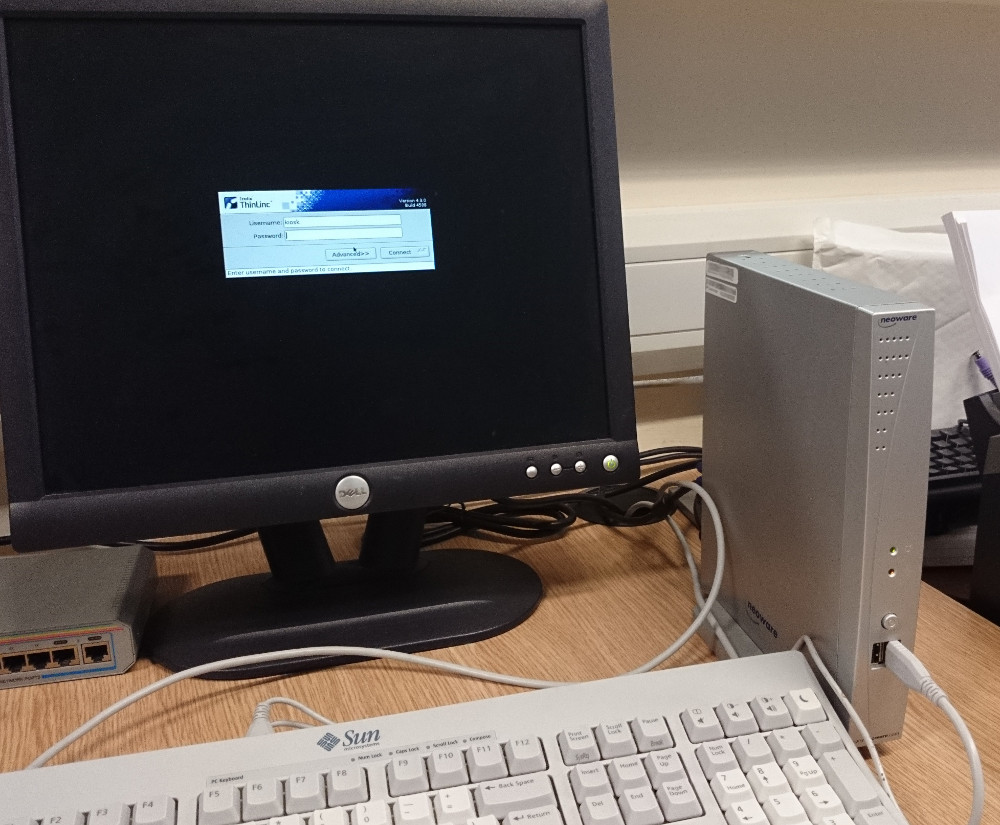
Right, so I had a bunch of old Neoware CA19 thin clients that I decided to re-use. Neoware CA19 is low power device with VIA Esther 400Mhz CPU, 256MB RAM, VIA Chrome chipset based graphics card and 128MB build-in flash storage device.
My main requirement was to connect users to Thinlinc server – so ThinLinc client was a must, RDP or NX clients as an option. I tried Thinstation project but failed miserably mainly due to lack of support for this hardware in newest version. After experimenting a bit further I eventually came up with different solution.
Essentially we PXE boot Neowares with Debian and take advantage of Linux capability to use NFS-mounted root device. Once booted we autologin user kiosk, start Fluxbox, and start Thinlinc in –loop mode. Easy.
I won’t be covering DHCP/TFTP/NFS server configuration as there are plenty of resources for that. Lets assume you have got this part ready, Linux installed and relevant services running.
So let get the ball rolling on your server:
mkdir -p /srv/nfsroot
debootstrap --arch=i386 squeeze /srv/nfsroot http://ftp.uk.debian.org/debian
echo "/srv/nfsroot 192.168.1.0/24(ro,no_root_squash,no_subtree_check)" >> /etc/exports
exportfs -rav
chroot /srv/nfsroot
CA19 has a rather old single core CPU hence decision to choose i386 branch with 486 kernel. Also, I use Debian Squeeze because support for Openchrome graphics driver has been dropped in Wheezy (correct me via comment if I’m wrong). But Squeeze is perfectly fine for my intended purpose
Now inside chroot we install bits and bobs we need.
apt-get update
apt-get install initramfs-tools linux-image-486
aptitude install fluxbox xserver-xorg xserver-xorg-video-openchrome xauth x11-utils x11-xkb-utils x11-xserver-utils xfonts-base xfonts-utils xinit xserver-common
wget thinlinc-client_4.3.0-4538_i386.deb from Cendio server
dpkg -i thinlinc-client_4.3.0-4538_i386.deb
sed 's/BOOT=local/BOOT=nfs/' -i /etc/initramfs-tools/initramfs.conf
echo aufs >> /etc/initramfs-tools/modules
vim /etc/initramfs-tools/scripts/init-bottom/aufs
fill with:
modprobe aufs
mkdir /ro /rw /aufs
mount -t tmpfs tmpfs /rw -o noatime,mode=0755
mount --move $rootmnt /ro
mount -t aufs aufs /aufs -o noatime,dirs=/rw:/ro=ro
mkdir -p /aufs/rw /aufs/ro
mount --move /ro /aufs/ro
mount --move /rw /aufs/rw
mount --move /aufs /root
exit 0
Next step:
chmod +x /etc/initramfs-tools/scripts/init-bottom/aufs
update-initramfs -u -k all
Adduser kiosk, use /etc/inittab to autologin user kiosk. Mine looks like that:
# 1:2345:respawn:/sbin/getty 38400 tty1
1:2345:respawn:/bin/login -f kiosk /dev/tty1 2>&1
2:23:respawn:/sbin/getty 38400 tty2
#3:23:respawn:/sbin/getty 38400 tty3 # one extra console is enough.
#4:23:respawn:/sbin/getty 38400 tty4 # or we can disable extra consoles whatsoever
#5:23:respawn:/sbin/getty 38400 tty5
#6:23:respawn:/sbin/getty 38400 tty6
Next, edit /home/kiosk/.profile and add line with
startx
Make sure Fluxbox is a default window manager
update-alternatives --config x-window-manager
Use /home/kiosk/.fluxbox/startup to start your app, with line like this:
/opt/thinlinc/bin/tlclient --loop your.thinlinc.server.com
otherwise ekhmm well, fully blown fluxbox will start, making it a lightweight workstation – whatever rocks your boat really.
I added ~kiosk/.thinlinc directory, with ~kiosk/.thinlinc/known_hosts populated with my server’s key to avoid being asked for it every time.
Set root password (passwd) and exit chroot.
One other modification I needed was bringing up loopback on start, otherwise Thinlinc client refused to connect with some weird error. So edit /srv/nfsroot/etc/network/interfaces to make it look like that:
auto lo
iface lo inet loopback
We are ready to boot Neoware CA19 with its new operating system!
Copy kernel and initramfs to TFTP directory
cp /srv/nfsroot/boot/vmlinuz-2.6.32-5-486 /srv/tftp/debianNFS/
cp /srv/nfsroot/boot/initrd.img-2.6.32-5-486 /srv/tftp/debianNFS/
My pxe configuration, yeah you’re right – it is based on Thinstation
vim /srv/tftp/pxelinux.cfg/default
DEFAULT diag/vesamenu.c32
PROMPT 0
MENU TITLE Linux Boot Menu
MENU BACKGROUND ts_bg.jpg
MENU COLOR TITLE 1 #ffffff #000000 std
MENU COLOR SEL 0 #ffffff #444444 std
MENU COLOR TABMSG 0 #999933 #000000 std
MENU COLOR UNSEL 0 #aaaaaa

LABEL ts
TIMEOUT 30
MENU LABEL ThinClient
KERNEL debianNFS/vmlinuz-2.6.32-5-486
APPEND ro initrd=debianNFS/initrd.img-2.6.32-5-486 root=/dev/nfs ip=dhcp nfsroot=192.168.1.1:/srv/nfsroot vga=34F
# quiet splash
Also, it would be shame not to use internal 128MB flash device so once Neoware is booted switch to ALT-F2, login as root, wipe sda device and reformat as swap. Make sure you do it on Neoware and not on your server! 🙂
fdisk /dev/sda
d #delete
n # new primary
t 82 # type is swap
w
and then
mkswap /dev/sda1
At the same time, once logged in on Neoware console it would be good to generate xorg.conf matching this hardware so run
Xorg -config
and copy resulting file back to NFS server
scp xorg.conf-new root@nfsserver:/srv/nfsroot/etc/X11/xorg.conf
Having a proper xorg.conf will speed up boot process a bit as X server won’t be wasting time for probing and guessing values – profit!
We want activate swap on boot so back on server edit /srv/nfsroot/etc/fstab and add
/dev/sda1 none swap discard 0 0
After restart “top” under ALT-F2 should show us 128MB swap available.
Finally, lets prepare Neoware device, enter BIOS and set under
- Advanced BIOS Features
First Boot Device - Disabled
Second Boot Device - Disabled
- Advanced Chipset Features
VGA share Memory size 64MB
- Integrated peripherals / VIA OnChip PCI Device
Onboard LAN Boot ROM - Enabled
That’s it. Boot time, from pressing power button to Thinlinc login screen is approx 50 seconds on old and crap 100Mbps switch. I could probably optimise that and shorten even further but hey, 50sec is good enough for me! Memory usage with Thinlinc session running is approx 150MB so roughly 50MB (plus 128MB swap) still free – some room for adding more functionality should we need it.
So here we are, Neowares are back in action in my labs. And instead of purchasing new PCs money saved can go into beefing up my servers! How cool is that?
 Right, so we got a bunch of those IGEL UD3-LX thinclients. They are pretty cool, even Youtube works over the remote connection to Thinlinc server!